

12 Stunning unique high-end pearl wedding nails
Pearl wedding nails are bridal manicures that use pearl-effect polish, small flat-back pearls (usually 1.5 to 4 mm), or both to give the hands a soft, reflective finish that sits well with a white or ivory dress. This article covers 12 ideas, a rough cost range of $15 to $40 for a DIY set or about $60 to $200 and up at a salon (approximate, prices vary by city and artist), and a time range of 30 minutes to about 3 hours.
The main problem with pearl nail art is not the look. It is the wear. Your hands will be photographed up close, you will be holding a bouquet, wearing a ring, hugging people in lace and tulle, and fastening a veil. A pearl that sits too high or is poorly sealed will catch on fabric and pop off. So the real work is choosing a design that looks refined in photos and still survives a long wedding day.
You do not need all 12 ideas. Pick one design that fits your dress, your nail length, and your budget, and then book a trial before the wedding. A simple set done well looks more high-end than a crowded one.
Jump To
- What to Check Before You Book
- The Basic Principles of Pearl Wedding Nails
- Essential Elements
- Pearl Nail Techniques
- The 12 Ideas, from simplest to most involved
- How to Start
- Common Mistakes
- Frequently Asked Questions
- The Finishing Touch
What to Check Before You Book
Start with the salon and the artist. Look through their recent work for close-up photos of pearl or 3D nail art, not only flat colors. Ask what products they use, how they seal small stones, and whether they offer a trial. Policies on bringing your own pearls, extra time for nail art, and deposits vary, so ask early.
Then look at your own nails. Pearl detail needs a stable base, and short, strong nails hold small pearls better than long, thin ones. If your nails are weak, peeling, or you have a skin or nail condition, talk to your nail technician or a doctor before booking. Many gel and builder products contain acrylates, and some people react to them. Check the labels, ask for a patch test if you have had a reaction before, and stop and ask a professional if you notice itching, redness, or swelling. This article is not medical advice.
Next, check the fit with the rest of your look. Take a photo of your ring and your dress fabric to the trial. Lace, tulle, and beaded fabric snag on raised nail art, so the pearls should sit low or be placed away from the free edge. If you plan to wear gloves, a veil, or a headpiece with small combs, test those against the nails too. Bring a photo of your bouquet if the stems are wired or rough.
Last, plan the timing. Many brides book a trial about 4 to 8 weeks before the wedding and the final set 1 to 3 days before, since gel usually lasts about 2 to 3 weeks depending on your nails and how you use your hands. Allow 1.5 to 3 hours for a detailed set. Ask for a small repair kit with spare pearls and top coat, and keep it with your emergency bag.
Quick Reference
- Best starting point: A sheer milky base with one pearl accent nail.
- Biggest impact: A pearl finish plus a fine French edge, because it reads clearly in close photos.
- Budget to start: Roughly $15 to $40 for a DIY kit (approximate, prices vary).
- Time: 30 to 45 minutes for a simple DIY set, 1.5 to 3 hours for a detailed salon set.
The Basic Principles of Pearl Wedding Nails
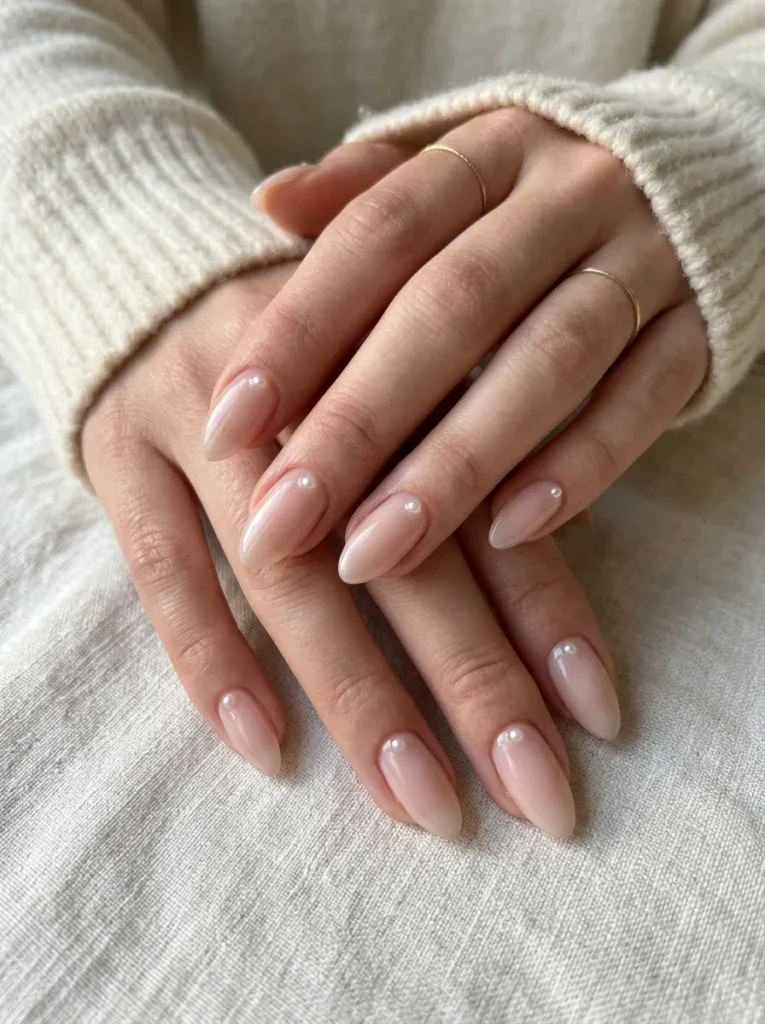
These rules help the set look refined and hold up for the full day.
Keep one focal point: Choose one place for the pearls, such as the ring finger, the cuticle line, or the tips. Putting pearls on every nail in the same way looks busy in photos.
Match the undertone: Look at the color of your dress and your skin. Warm ivory dresses suit champagne and cream pearl tones, while bright white dresses suit cool white or pale pink.
Use a sheer base: A milky or sheer pink base is forgiving as nails grow out. Solid opaque white shows every gap at the cuticle within a week or so.
Keep pearls low and few: Use pearls with a flat back, between 1.5 and 4 mm, and keep each nail to fewer than five. Raised pieces catch on lace and hair.
Seal everything: Cap the free edge and seal the pearl edges with a thin layer of top coat. Unsealed edges lift first.
Test before the day: Wear the trial set for at least a few days. Hold the bouquet, put on the ring, and touch the dress to see what catches.
Essential Elements
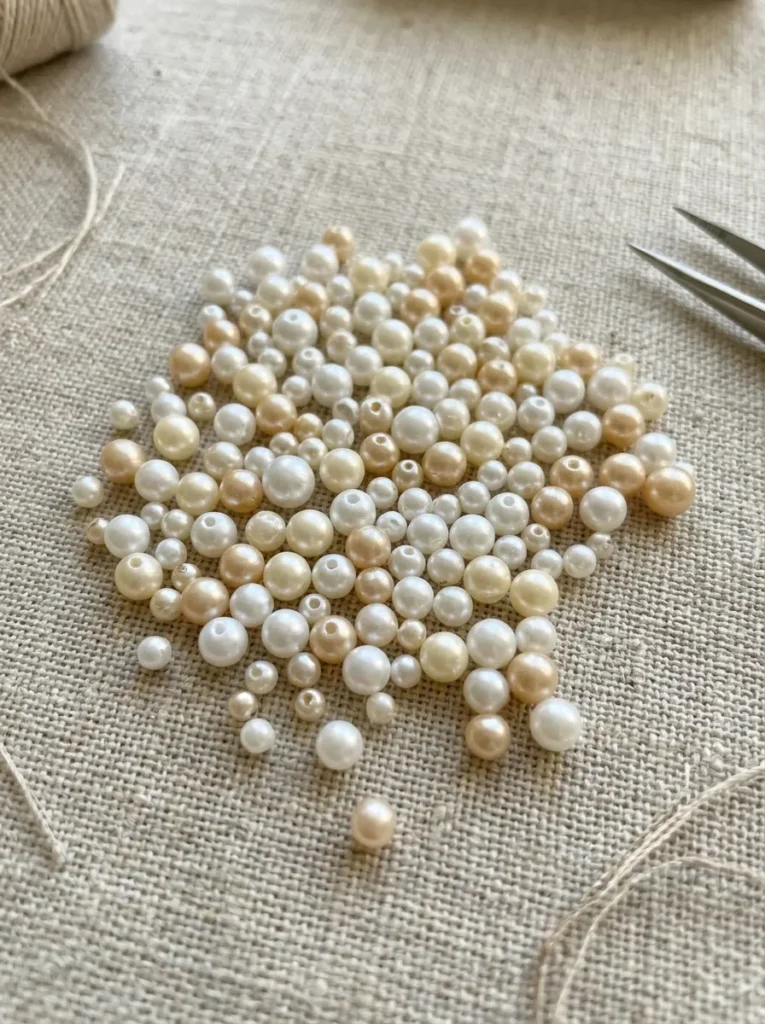
You can use these at home or bring them to your salon.
Flat-back pearls: Sizes from 1.5 to 4 mm, in white, ivory, and champagne. Buy a mix of 2 or 3 sizes, about 50 to 100 pieces, since small ones are easy to lose.
Sheer base polish or gel: A milky pink, nude, or soft white. Choose one that is sheer enough to build in 2 thin coats.
Pearlescent topper: A fine pearl shimmer or chrome powder that gives the glow without chunky glitter. Check the label for gel or regular polish.
Gel top coat: A no-wipe top coat and a thicker “builder” or “gel glue” for setting pearls. Cure times are usually 30 to 60 seconds in an LED lamp, but follow the label.
LED lamp: A 36 to 48 watt lamp is common for gel kits. Check that the lamp suits your products.
Dotting tool and tweezers: A small dotting tool picks up pearls, and fine tweezers place them. A tool with a 1 to 2 mm tip is enough.
Prep and removal kit: Nail file (180 grit), buffer, cuticle oil, lint-free wipes, and acetone or the removal product listed on your gel brand.
Shop This Look
- Flat back pearls for nails, assorted sizes
- Milky pink gel nail polish
- Nail art dotting tool and tweezers set
Pearl Nail Techniques
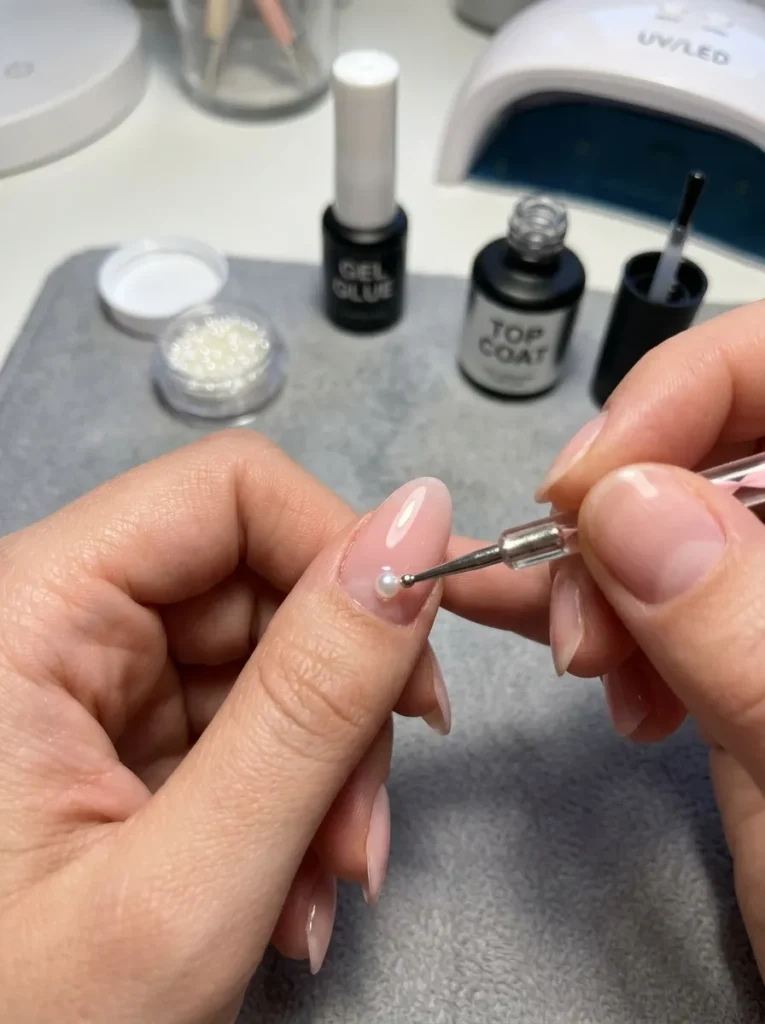
These are the methods most nail artists use, and you can do several at home.
Pearl setting: Place a small dot of gel glue on the nail, pick up the pearl with a dotting tool, and press it in. Cure for the time on the label, then cap the base edge with a thin layer of top coat.
Chrome rubbing: Cure a thin layer of no-wipe top coat, rub a small amount of pearl chrome powder on with a sponge applicator, and wipe off the extra. Seal with a thin top coat layer and cure.
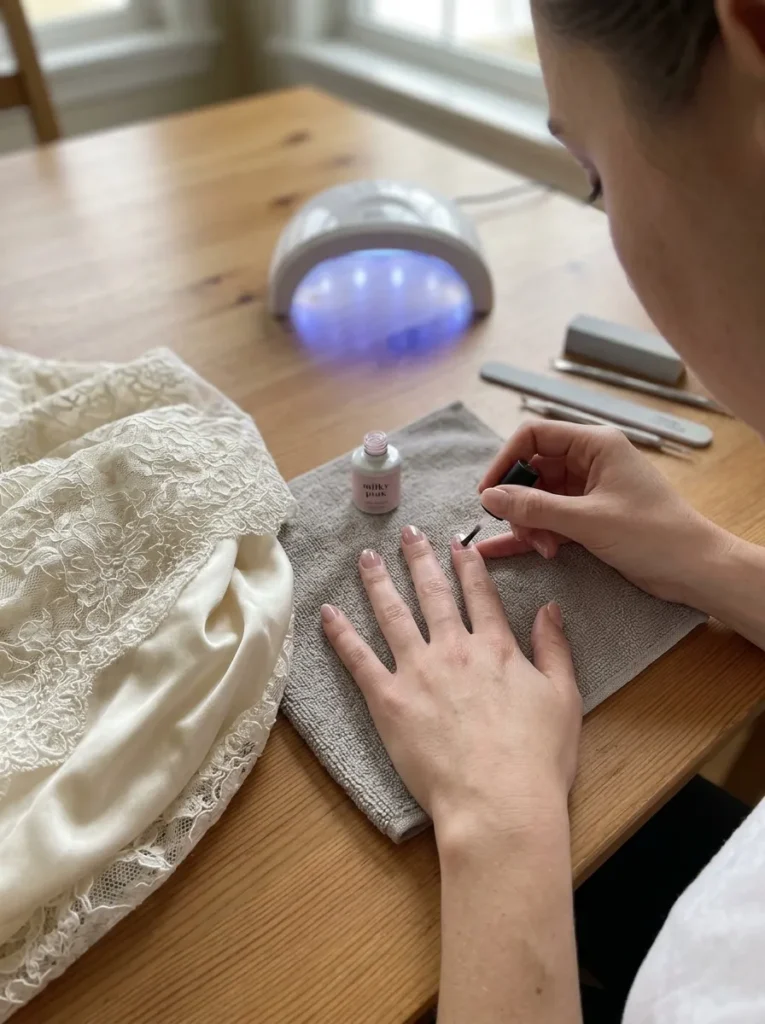
Milky layering: Apply two thin coats of sheer white or pink, curing each one. Build color slowly, and stop when the nail looks soft, not chalky.
Micro French lining: Use a thin brush and a small amount of polish to draw a line about 1 mm wide at the tip. Steady your hand by resting your pinky on the table, and clean the edge with a flat brush and acetone.
Dry pressing: Brush a thin layer of top coat on the nail, set the pearls at the cuticle line, and cure. The thin layer keeps the pearls from sliding.
Edge capping: Run the brush along the free edge of the nail with the top coat to seal it. This prevents lifting and chipping, especially around the tips.
Milky Pearl Wedding Nails With One Accent Pearl
This is the simplest bridal set. A sheer milky pink or white base on all nails, with a single 3 mm pearl on the ring finger near the cuticle. It looks clean, photographs well, and suits short and medium nails.
Base note: Use two thin coats and cure each one. A thick coat can look streaky or uneven. Test the color against your dress fabric, because a pink-based milk can look gray next to a very warm ivory.
Placement tip: Place the pearl about 2 to 3 mm above the cuticle, centered, and seal around it. Skip the pearl on the thumb if you plan to hold the bouquet with it. This suits brides who want something subtle for a civil ceremony or a small wedding.
Shop This Look
Pearl Chrome Glaze Over a Sheer Pink Base
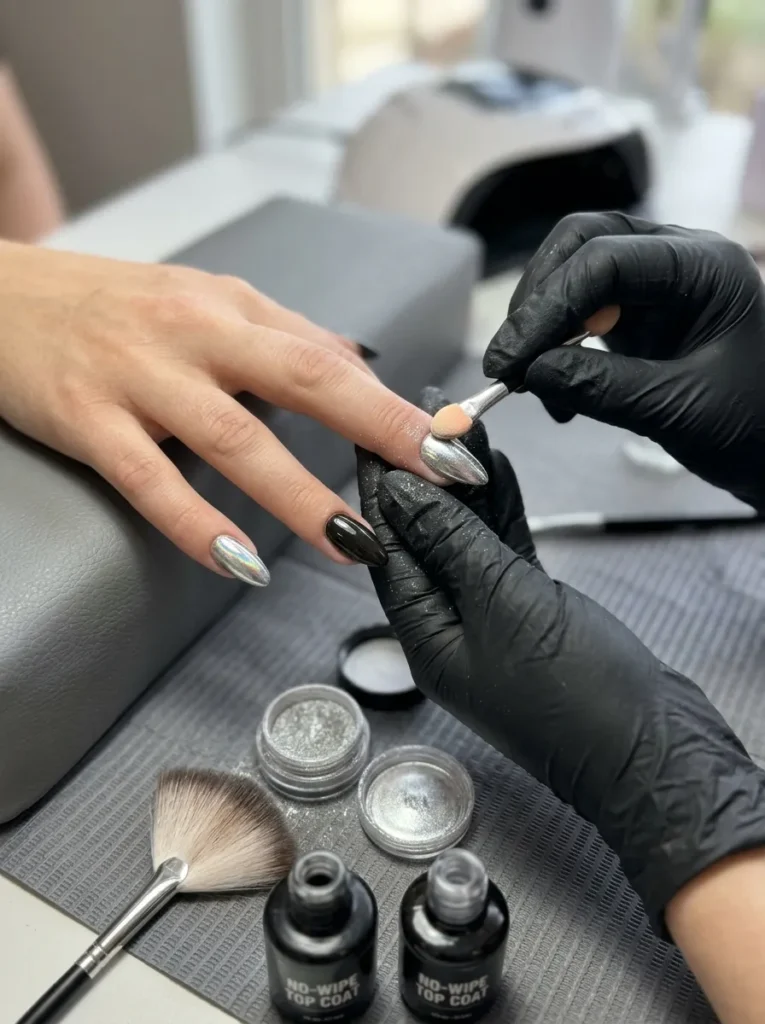
A pearl chrome glaze gives the whole hand a soft, even shine with no raised pieces at all. It works as a base for any other idea, and it is the lowest-snag option. Use a fine pearl or white chrome powder over a sheer pink base.
Powder note: Chrome powder only sticks to a cured no-wipe top coat, so check your product type first. Apply a small amount with a sponge applicator, and wipe the dust off before sealing, or the finish looks patchy.
Finish tip: Choose a cool pearl for a white dress and a warm pearl for an ivory dress. Test one nail before you do all ten. This suits brides who want a polished, low-maintenance set, and it works on short nails.
Shop This Look
Pearl French Tip Wedding Nails
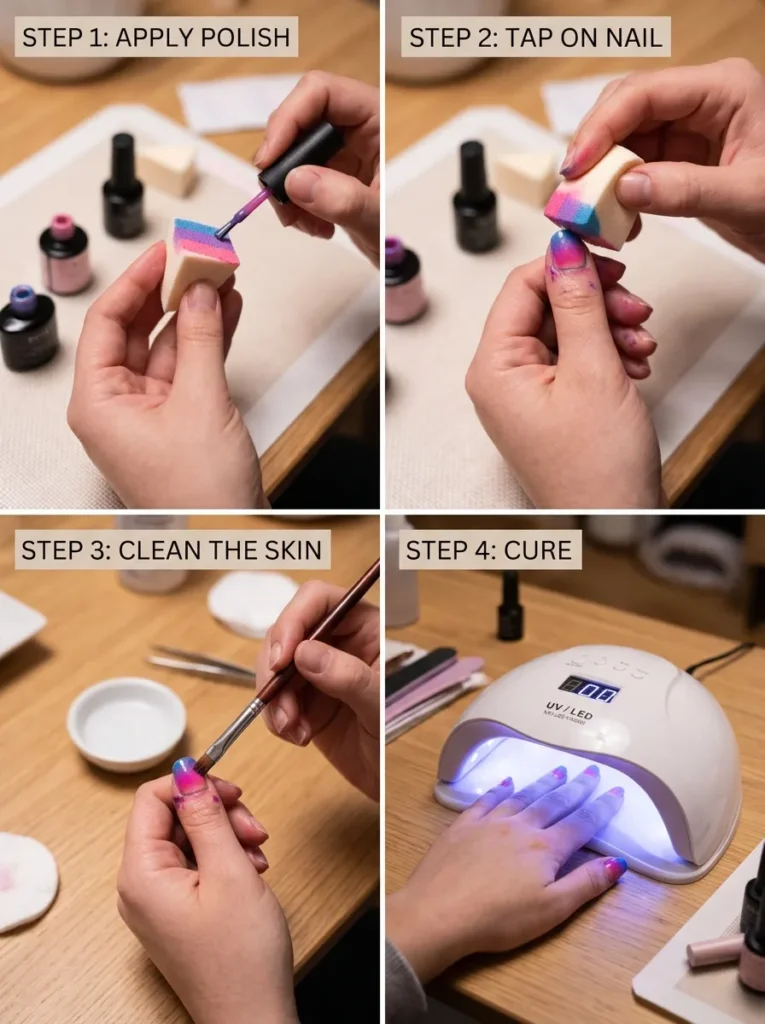
A pearlescent French tip is a classic bridal choice. Draw a thin curved tip, about 1 to 2 mm at the center, using a pearl white polish on a sheer base. It makes nails look longer and neater, and it grows out well.
Line note: Use a long, thin striping brush and keep the tip line the same width across all ten nails. A line that is too thick looks heavy, so start thin and go over it again if needed. Wipe the edge with a flat brush and acetone to clean it up.
Shape tip: Square-oval and almond shapes show a French tip best. Very short nails can look blunt with a thick tip, so keep the line close to 1 mm. This suits brides who want a traditional look with a modern pearl glow.
Shop This Look
Soft Pearl Ombre Wedding Nails With a Sponge Fade
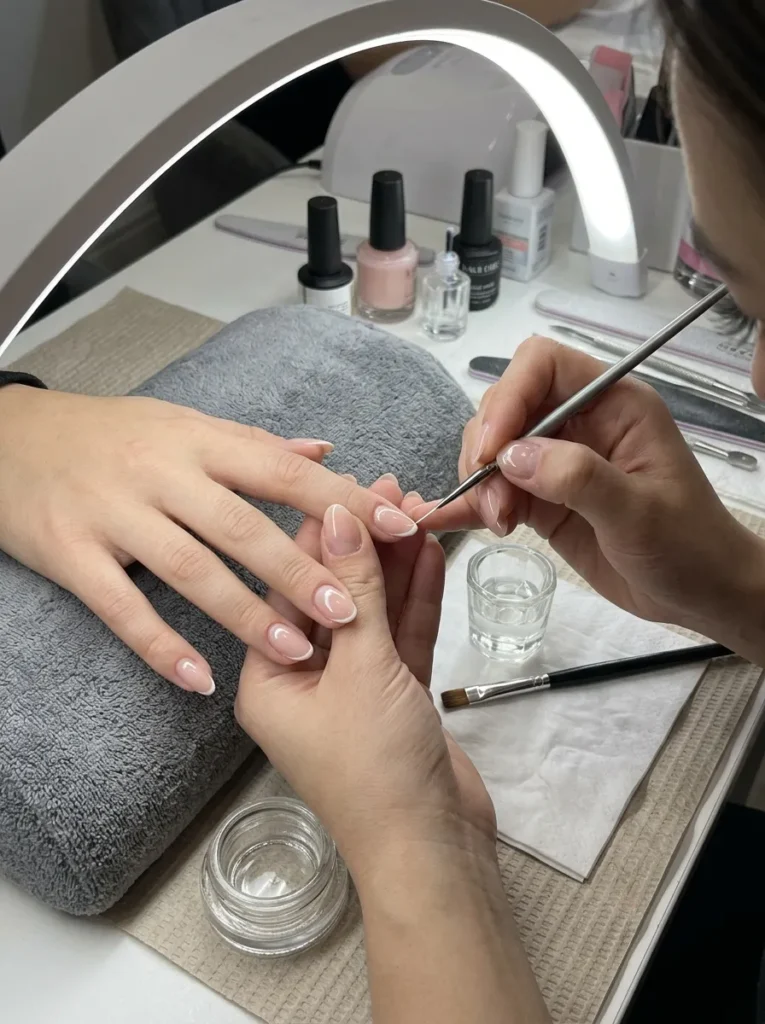
A sponge fade blends a pale pink base into a pearl white tip with no hard line, so growth is almost invisible. It is flat, has no raised pieces, and suits brides who want a quiet set. Use two sheer shades that sit close in tone.
Sponge note: Dab a small amount of each color on a makeup sponge, then press it onto the nail in light taps, building color over 2 to 3 layers. Too much polish on the sponge leaves a heavy edge. Cure between layers, and clean the skin around the nail before the final cure.
Tone tip: Keep the two shades within one or two steps of each other, and finish with a thin pearl chrome glaze for shine. This suits short and medium nails, and brides who want an easy touch-up at about week 2.
Shop This Look
Pearl Cuticle Line Wedding Nails
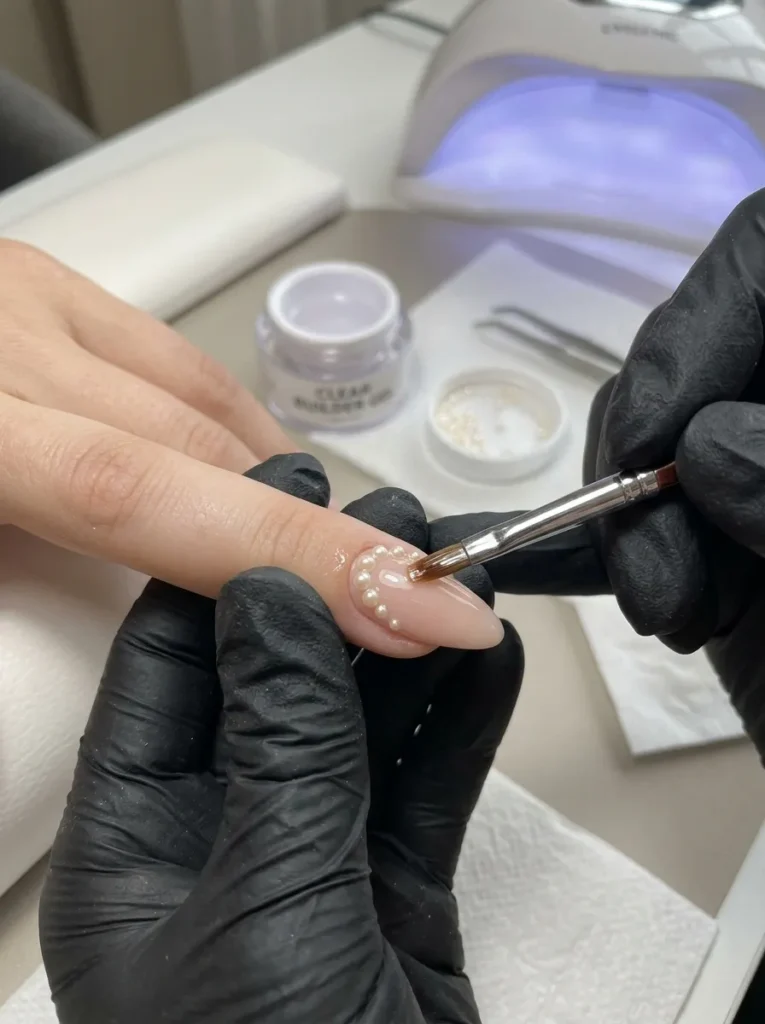
Instead of the tip, place tiny 1.5 mm pearls in a curved line along the cuticle, following the natural shape of the nail. This frames the nail from the base, and the free edge stays smooth, which helps with lace and veils.
Spacing note: Use 5 to 7 pearls per nail, with about 0.5 mm of space between each. Set them with a thin line of gel glue, and press gently so they stay in line. Over-pressing pushes the glue out and makes the edge messy.
Growth tip: Keep the pearls about 1 mm above the cuticle, not touching the skin, so there is room for the nail to grow. Plan a touch-up around week 2. This suits short to medium nails and brides who want to keep the tips clear for a ring.
Shop This Look
- 1.5 mm nail pearls, tiny, white
- Gel nail glue for rhinestones and pearls
- Nail art picker pencil wax tip
Scattered Mini Pearl Wedding Nails in Clear Gel
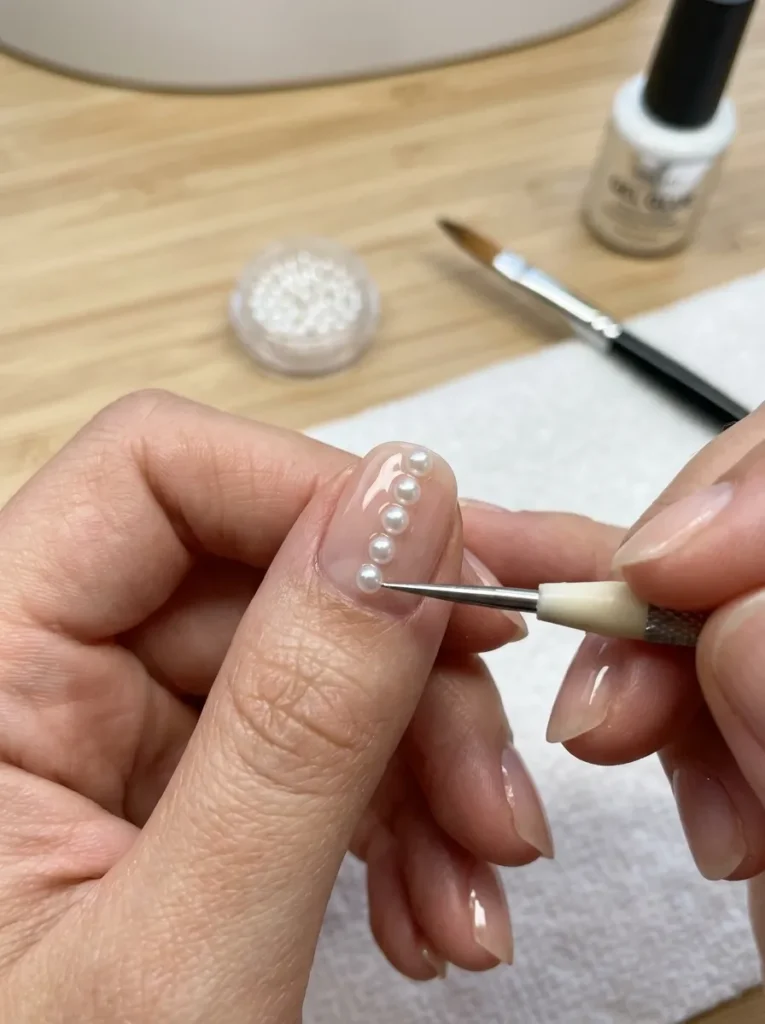
Set a few pearls in sparse positions across the nail, then cover with clear gel so they sit under a smooth surface. The result looks like pearls floating inside the nail, and nothing catches on fabric. Use 1.5 to 2.5 mm pearls, three to five per nail.
Layer note: Place the pearls on a cured base layer, add a thin coat of clear builder gel, and cure. A thick layer makes the nail look bulky, so keep it under about 1 mm. Check that the gel is clear and not yellowing.
Pattern tip: Space the pearls unevenly rather than in a straight row, and leave some nails with fewer pearls. Mix two sizes. This suits short and medium nails, and brides who want a delicate, sparkly look.
Shop This Look
Pearl and Fine Gold Line Wedding Nails
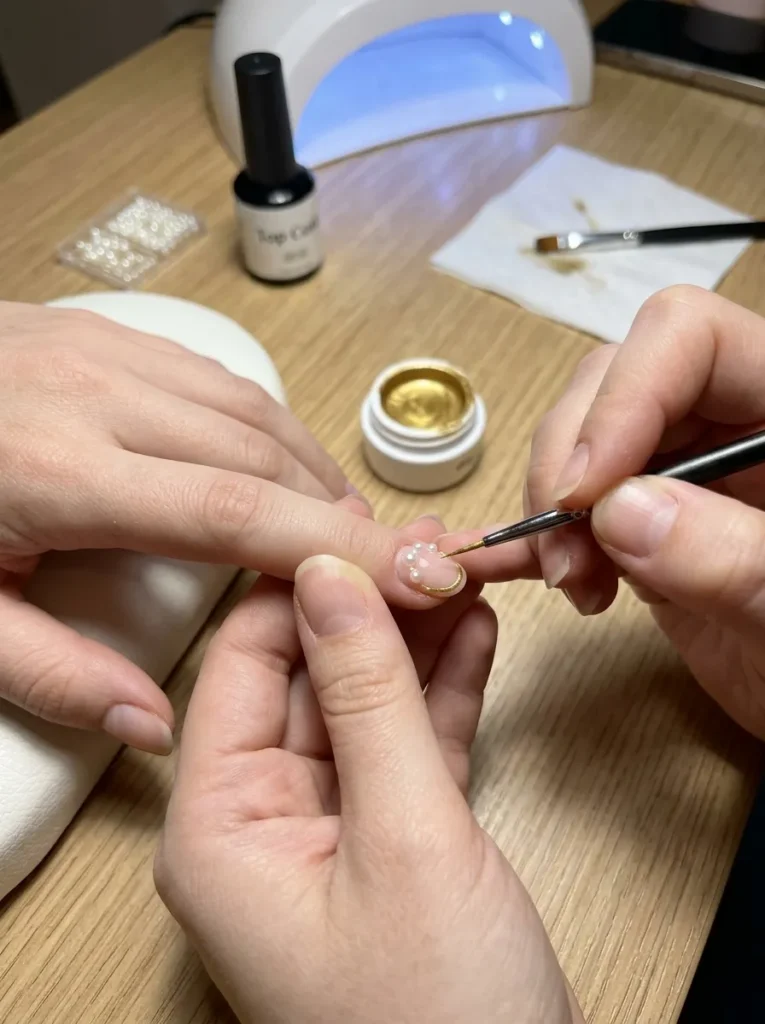
Thin gold lines paired with pearls give a more formal, jewelry-like look. Use a 1 mm gold line along one side of the nail, or a thin curved line across the cuticle, with two or three 2 mm pearls at the end. Gold works best with warm ivory and champagne tones.
Gold note: Use gold gel paint or fine foil, and a thin liner brush. Lines need a steady hand, so rest your hand on a table. Wipe mistakes before curing. Seal the line fully with top coat, or it may wear off faster than the pearls.
Metal tip: Choose a soft gold for ivory dresses and silver for cool white dresses, and match it to your jewelry. Keep the lines to two or three nails. This suits brides wearing gold or champagne accessories.
Shop This Look
Lace Stamping With Pearl Wedding Nails
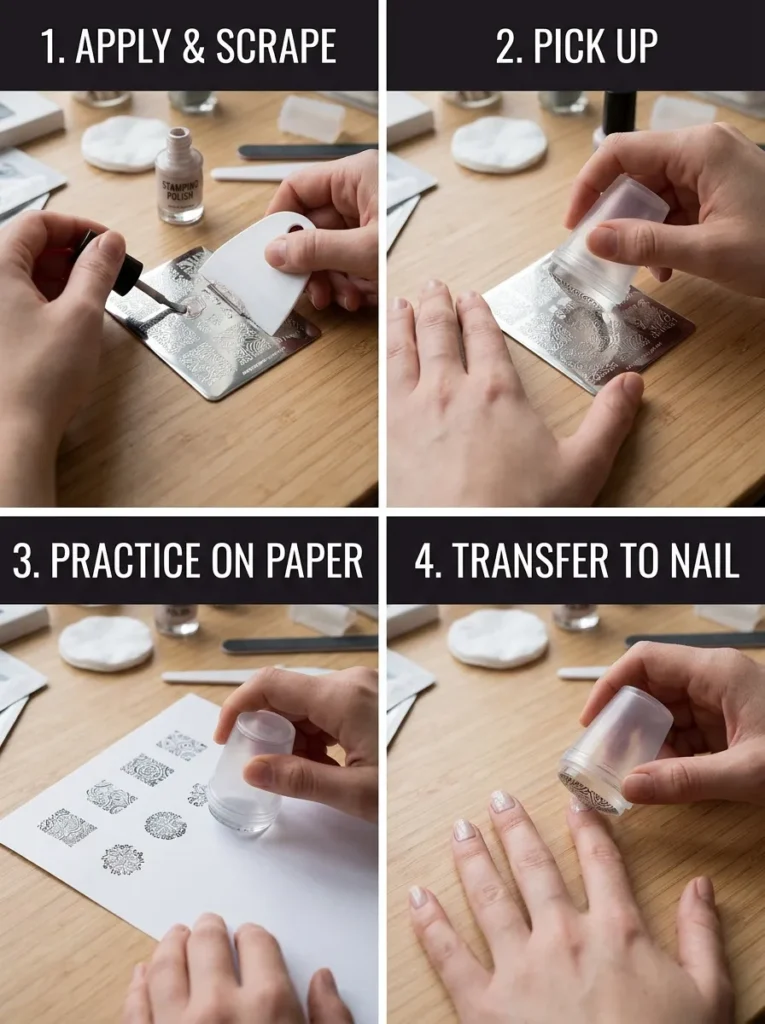
Lace stamping copies the pattern of the dress onto the nail. Use a white or ivory stamping polish with a lace plate, then add two or three tiny pearls at the points where the pattern crosses. It works best on a sheer pink or nude base.
Stamp note: Use stamping polish made for the technique, since regular polish does not transfer well. Press the plate, scrape, pick up the design with a silicone stamper, and place it on the nail in one motion. Practice on a sheet of paper first.
Dress tip: Bring a photo of the lace to the trial, and match the pattern scale to the nail, since large motifs get cut off on small nails. Seal with a thin top coat. This suits brides with a lace or embroidered dress and medium to long nails.
Shop This Look
- Nail stamping plate lace pattern
- White stamping polish for nails
- Silicone nail stamper and scraper kit
Mother of Pearl Shell Flake Wedding Nails
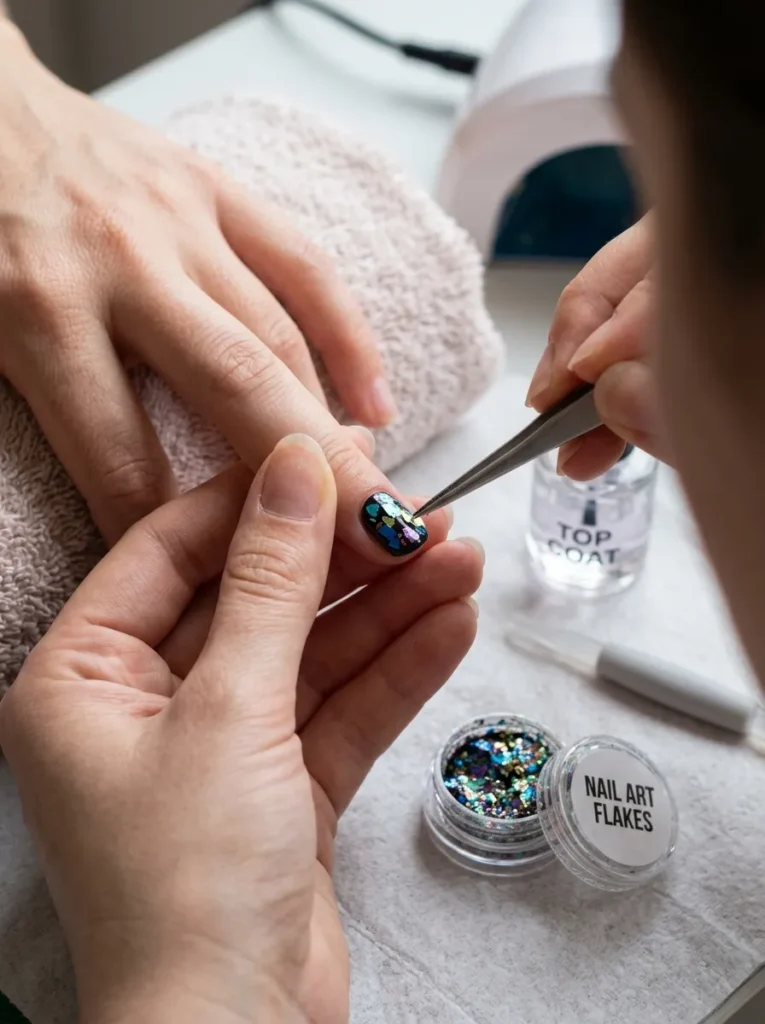
Real or imitation shell flakes create a soft, iridescent surface that looks like the inside of a shell. Lay thin flakes about 1 to 3 mm across over a sheer base and cover with gel. It gives the hands a glow with no raised pieces.
Flake note: Use tweezers to place the flakes, and press flat before curing. Flakes can lift at the edges if not sealed, so use two thin top coat layers. Check the product label, and look for flakes made for nails, not craft shells.
Light tip: Shell flakes shift color in different light, from white to pale pink and green. Test one nail in daylight and indoor light. This suits outdoor weddings and brides who like a more natural, organic finish.
Shop This Look
A Pearl Cluster Accent for Pearl Wedding Nails
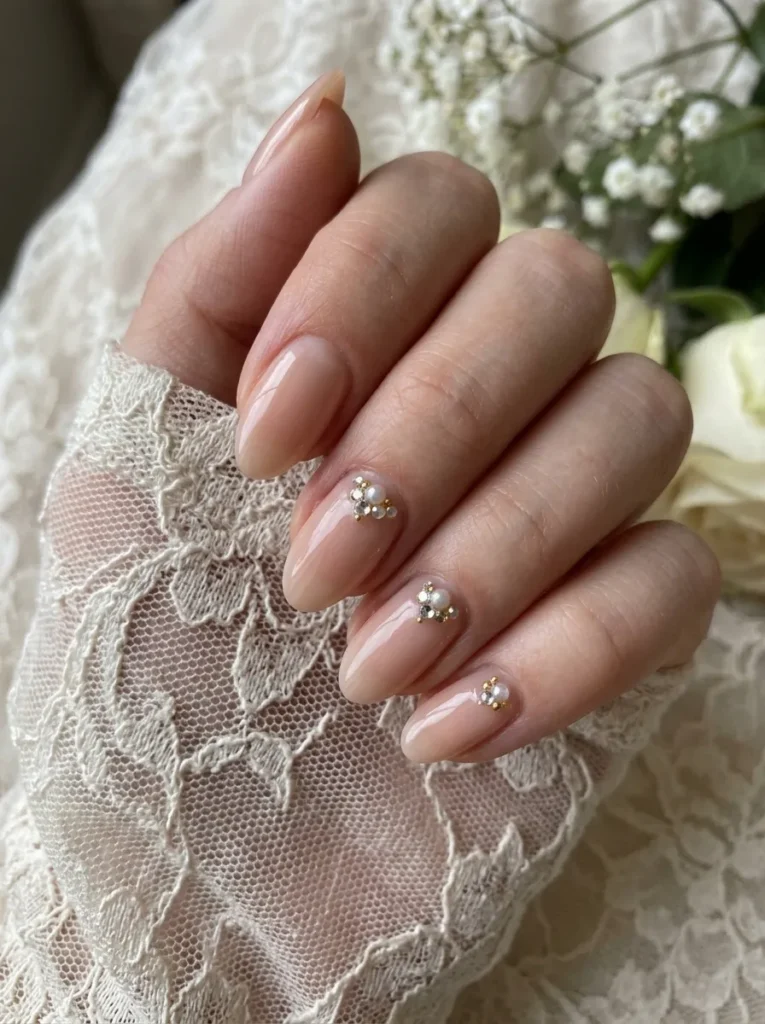
A cluster of three or four pearls in different sizes on one nail gives a raised, jewelry-like look. Use 2, 3, and 4 mm pearls, set at a slight angle near the cuticle. This is a good choice for the ring finger, since it draws attention to the ring in photos.
Height note: Raised clusters catch on lace and hair, so keep the group small and close to the cuticle, not the tip. Set with a strong gel glue, cure each piece, and seal around the base. Do not use a cluster on the thumb or index finger if you plan to hold flowers.
Test tip: Wear the set for a few days before the wedding, and check if the pearls catch on clothing. Carry two spare pearls and a small bottle of glue. This suits medium to long nails and brides with sleeveless or smooth-fabric dresses.
Shop This Look
Pearl Chain Accent Wedding Nails
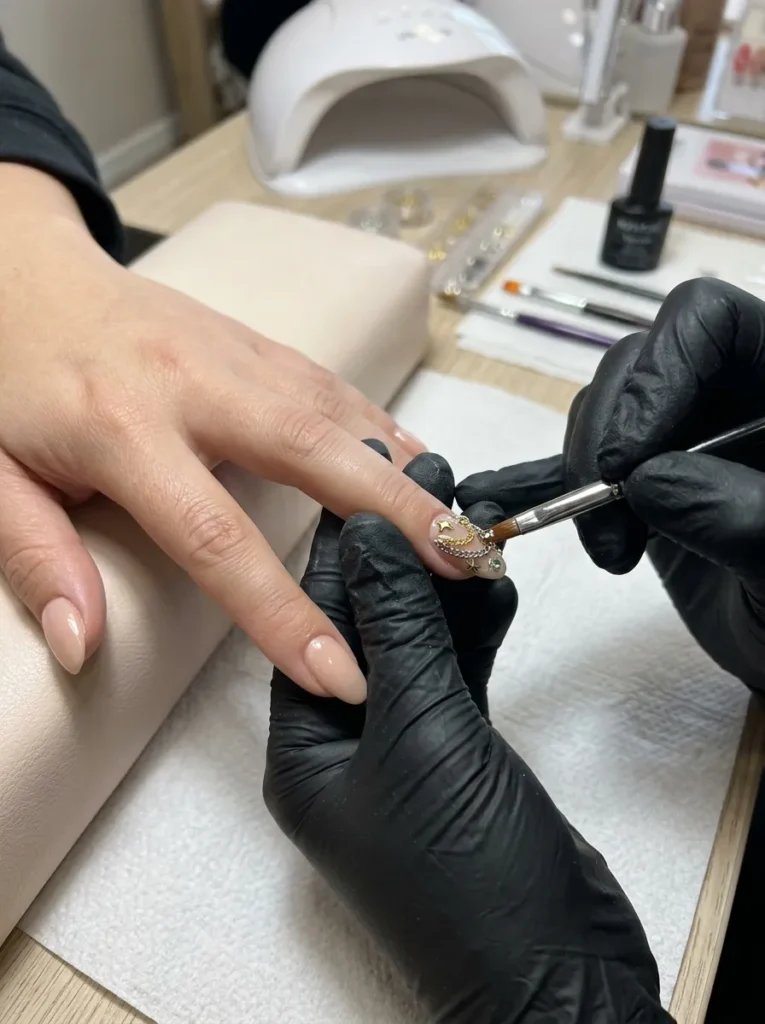
A thin nail chain with a pearl charm gives the set a high-end, jewelry look. Use a fine gold or silver chain about 2 to 3 cm long, draped across the nail with a 3 mm pearl at each end. It works best on one accent nail.
Chain note: Metal chains and charms need strong gel glue, and a secure cap on each end. They add height, and they can snag on tulle and hair. Keep the design to one nail, and ask your artist to seal both ends and test the pull.
Fit tip: Place the chain on the ring finger of the hand that will not hold the bouquet, and check that it does not touch the ring. Bring a spare charm and glue. This suits brides who want a statement piece and have a smoother dress fabric.
Shop This Look
A Custom Bridal Pearl Set to Match the Dress
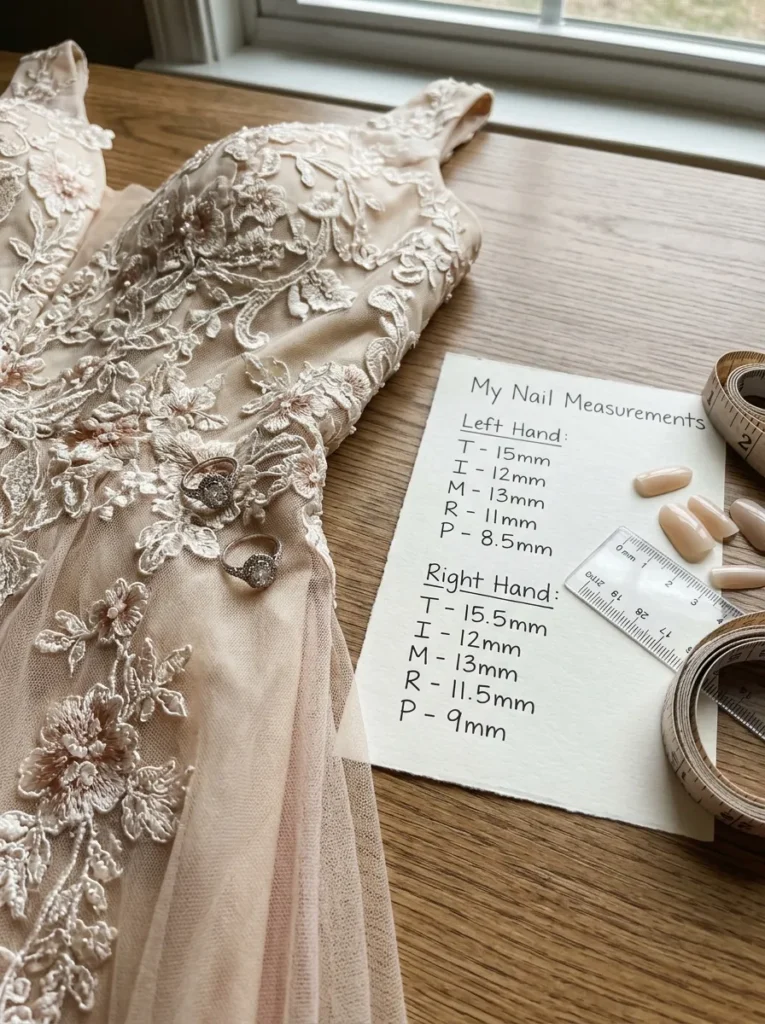
This is the most involved idea. A custom set uses details from your dress, such as lace shape, bead color, or a monogram, built into a pearl design across all ten nails. It is often made as press-ons on a custom size, or as a full salon set with an artist who does nail art.
Planning note: Send the artist a close photo of the dress, the ring, and your nail measurements if you order press-ons, and allow 3 to 4 weeks for custom work. Prices vary a lot, roughly $100 to $300 or more (approximate). Check the artist’s return and repair policy before you pay.
Backup tip: Ask for a spare set or a repair kit, and test the fit and weight at least 1 to 2 weeks before the wedding. Press-ons need proper nail prep and glue. This suits brides who want a full custom look and are willing to plan ahead.
Shop This Look
How to Start
Start with your dress. Take a photo of the fabric, the neckline, and the hands you will see in photos, and decide how much detail the dress already has. A heavily beaded dress usually needs simpler nails, and a plain dress can carry more.
Then work in order. Pick the base color first, then the shape, then one pearl detail. Book the trial about 4 to 8 weeks before the wedding, wear it for a few days, and change one thing if needed. Book the final appointment 1 to 3 days before the wedding, not the same day, so you have time for repairs.
If you are doing this at home and have about $30 to $40 (approximate, prices vary), buy three things: a sheer milky base, a pack of flat-back pearls in two sizes, and a gel top coat with a small tube of gel glue. If you do not already own an LED lamp, add one, and check that it suits your products. That is enough for the one accent pearl design and the chrome glaze.
Be realistic about time and budget. A simple DIY set takes about 45 to 90 minutes, and a detailed salon set takes 1.5 to 3 hours. Salon costs vary a lot by city and artist, so ask for a price at the trial, and leave room for a tip and a repair visit.
Shop This Look
Common Mistakes
Booking the same day: A same-day appointment leaves no time for repairs and adds stress. Book 1 to 3 days before, and keep a repair kit with you.
Choosing opaque white: A solid white base shows every gap as nails grow, and it can look flat against an ivory dress. Use a sheer milky or pink base instead.
Using too many pearls: More than four or five per nail looks heavy in photos and snags more. Keep one focal point and leave other nails plain.
Skipping the trial: Without a trial, you will not know how the set feels with your ring, dress, and bouquet. Do a trial and wear it for several days.
Placing pearls on the tips: Raised pieces at the free edge catch on lace and hair. Keep them near the cuticle, or under a layer of clear gel.
Not sealing the edges: Unsealed pearl edges and free edges lift first. Ask for a thin top coat around each pearl and along the tip.
Ignoring skin reactions: Itching, redness, or swelling after gel products is a sign to stop and ask a professional. Check labels, and tell your artist about any past reactions.
Frequently Asked Questions
How long do pearl wedding nails last?
A gel set with pearls usually lasts about 2 to 3 weeks, depending on your nails and how you use your hands. Pearls near the free edge lift sooner than those near the cuticle. Ask your artist how they seal the pearls, and carry a repair kit on the day.
Are pearl wedding nails suitable for short nails?
Yes, if the design is small. A pearl chrome glaze, a cuticle line, or a single 2 to 3 mm accent works well on short nails. Avoid large clusters and long chains, since they look crowded and catch more easily.
What color pearls suit an ivory dress?
Warm pearl tones such as champagne, cream, and soft gold suit ivory dresses. Bright white pearls can look cold against warm fabric. Hold a nail swatch or a photo against the dress fabric in daylight before you decide.
How much do high-end pearl wedding nails cost?
Many salons charge roughly $60 to $200 and up for a detailed gel set with nail art, and custom press-on sets can cost more (approximate, prices vary by city and artist). A DIY kit costs about $15 to $40. Ask for a quote at the trial, since pearl work takes extra time.
Can I do pearl wedding nails at home?
Yes, for simple designs. A sheer base, a few flat-back pearls, and a gel top coat are enough for the accent nail or the cuticle line. Follow the lamp and product instructions, and book a salon for detailed work such as stamping, clusters, or chains.
The Finishing Touch
Step back and check four things in daylight and indoor light. First, does the base color suit your dress and skin? Second, are the pearls low and sealed, with no sharp edges? Third, can you hold the bouquet and wear the ring without catching anything? Fourth, is the design limited to one focal point? If one fails, that is the fix to make first.
If something still looks off, change one thing and look again. Remove one pearl, shorten a French line, or swap a warm pearl for a cooler one. Make one change at a time and take a close photo each time, because pearl wedding nails look different on camera than in person.
Today, do one thing: book your trial appointment, or test one pearl on a single nail at home. It takes about 20 minutes and shows you how the design wears. When you find the sets you like, save your favorite pearl wedding nails to a Pinterest board so you can show your nail artist.
Keep Exploring
- [Replace with a related post on bridal beauty timeline]
- [Replace with a related post on wedding day emergency kit]
- [Replace with a related post on bridal jewelry ideas]


